Saturday, August 16, 2008

Booting into Recovery Menu

This post will familiarize the usage of the Recovery Menu available in PSP Custom Firmwares.

First of all you need to shutdown the PSP. No, not just pushing up the power button but pushing it up and holding there until the POWER LED stops flickering. In case you werent aware, just pushing up and relasing the power button puts the PSP in sleep mode.

Now, reboot the PSP while holding down the Right Button.

This should show you the M33 Recovery Menu.

M33 Recovery Menu
Main menu
Toggle USB
Configuration ->
Run program at /PSP/GAME/RECOVERY/EBOOT.PBP
Advanced ->
CPU Speed ->
Plugins ->
Registry hacks ->
Exit

*********************************************************************

The current active menu option is highlighted in red and can be selected by pressing the (x) button. Selecting a Menu option with a trailing -> leads you into a sub-menu with further options.

Following is a run down of the available options:

Toggle USB - Enables/Disables USB connection

Configuration -> Leads you to a submenu with following options
Back - Return to main menu
Skip Sony logo (currently: Disabled) - Allows to disable startup Sony logo
Hide corrupt icons (currently: Disabled)
Game folder homebrew (currently: 4.xx Kernel)
Autorun program at /PSP/GAME/BOOT/EBOOT.PBP (currently: Disabled)
UMD Mode (currently: Sony NP9660 -NO UMD-) - Driver for UMD. Can be set from VshMenu
Fake Region (currently: Disabled)
Use VshMenu (currently: Disabled) - Allow VshMenu in XMB
XMB Usb Device (currently: Memory Stick) - Device to connect to in USB Mode
Charge Battery when USB cable plugged (currently: Disabled)
Use M33 network update (currently: Enabled)
Hide PIC0.PNG and PIC1.PNG in game menu (currently: Disabled)

Run program at /PSP/GAME/RECOVERY/EBOOT.PBP

Advanced -> Leads you to a submenu with following options
Back
Advanced configuration ->
Back
Plain modules in UMD/ISO (currently: Disabled)
Execute BOOT.BIN in UMD/ISO (currently: Disabled)
Toggle USB (flash0)
Toggle USB (flash1)
Toggle USB (flash2)
Toggle USB (flash3)
Format flash1 adn reset settings


CPU Speed ->
Back
Speed in XMB (currently: Default)
Speed in UMD/ISO (currently: Default)

Plugins -> Lists your available plugins and their status.
Back
{List of plugins from VSH.txt}
{List of plugins from GAME.txt}
More about Plugins in a later post..

Registry hacks ->
Back
Button assign (currently: X is enter) - To specify which button to use as enter on Recovery menu.
Activate WMA
Activate Flash Player

Exit - Exits from Recovery mode and reboot the PSP

Read full article...

Wednesday, August 13, 2008

Displaying the M33 VSH Menu

Now that we have CFW installed on the PSP, lets see what interesting things we can do.. :)

While in your XMB, press Select. You should see a menu appear on the screen.
This is the M33 VSH Menu.
.


PS: The Red background is due to the screenshot tool used. You should see text against blue background.

The VSH menu gives you options to:
  1. Set CPU Clock speed for XMB
  2. Set CPU Clock speed for Game
  3. Specify the device to connect to in USB Mode
  4. Specify UMD ISO Mode - Lets you specify a UMD Driver to be used to allow running homebrew without a physical UMD.
  5. Mount ISO Videos from your memory card
  6. Reboot (reset) the PSP
  7. Exit from the VSH Menu


Read full article...

Tuesday, August 5, 2008

The Power Button!!

The PSP's Power button serves three functions

Sleep Mode

Shut Down

Lock

This is really a thoughtful design put into this tiny button making it really POWERful..

Read full article...

Monday, August 4, 2008

Installing Custom Firmware on PSP

What is Custom Firmware?
Custom Firmware (CFW) is an alternative software you can load on your PSP instead of Sony's official software.

CFW opens a whole new arena by enabling you to run Homebrew applications and games on your PSP. There are also possibilities of customizing the look and feel of your PSP's operating system and plugins.

CFW is not blessed in official circles because it does also open the window of piracy by allowing you to run games via ISO on your memory sticks.

PS: If you like a game, buy the game.

You can read tons of pages across the Internet by googling for PSP custom firmware. But to put long story short; Dark Alex is the God of PSP Firmware. He was the one to unravel the mysteries of PSP and blessing us with the Pandora.

In this post, I am just going to summarize the steps I did to get my PSP Hacked.


There are numerous tutorials on all PSP forums detailing the process of installing CFW on your PSP. Following are some I liked:
  1. PSP Hacking Guide on Blast Processing - Very informative and detailed and has multiple chapters familiarizing you with the entire world of CFW.
  2. A Guide on PSPMods by Hercules
  3. Another tutorial at PSP Slim Hacks
Basically, you will find what you need by going through these tutorials. And since I cant really add anything more to the tutorials, I am not going to write another one myself. Instead following is a summarized version of all the steps I did to hack my PSP.

Cautionary notice to not blame me or any one else if you manage to brick your PSP while trying to hack it using information given on this site. Inherently the software used is quite safe and method tested. But there are few error scenarios like battery (accidentally) popping out during installation, etc. If you brick it, you are responsible for it and start searching for tutorials to unbrick your PSP. Ok, lets get back to good things.

To install Custom Firmware you need two basic things:
  • A Pandora Battery
  • A Magic Memory Stick

A Pandora Battery is a modified PSP battery that when inserted, boots the PSP into service mode. There are ways to hard mod a battery and software tricks using an already hacked PSP to create a Pandora battery.
Since I was to skeptical to try the hard modding and I didn't have a hacked PSP; I opted for another easy way - and bought one of these Datel Tool Battery from Amazon. Its pretty cheap and does the job. Highly recommended if you don't want to get your hands dirty.

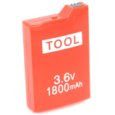
The second thing you need is a Magic Memory Stick (MMS) - its just another MS Pro Duo card but with some magical software on it.

Again, there are "n" tutorials out there detailing the creation of the MMS. Here again I found a short and sweet way. Download Gandalf's Memory Stick Creator. This single download contains all the software we need. It contains Despertar del Cementerio v4 and installs CFW 3.80m33-5.
Despertar del Cementerio is the "Universal Unbricker" for PSPs.

A note on the MS Pro Duo card to be used. I came across several articles and posts on various forums suggesting that your need an original Sony MagicGate enabled memory stick for this. However, I used a 4Gb MicroSD card plugged into a Pro Duo adapter and it just worked fine for me.

Also all tutorials suggest that these methods have been used on WinXP only. I have used this method on Vista.

Creating a Magic Memory Stick
  1. Format your memory stick using either your PC's format or PSP's format option.
  2. Plugin your PSP to your PC and switch to USB mode.
  3. Unzip the DCv4-TM (Gandalf's package) to your PC desktop.
  4. Run InstallDCv4.bat as admin
  5. Press "y" when prompted to begin installation
  6. Once installation is complete; exit the bat process on pc by pressing any key on PC's keyboard.
  7. On your PSP, press (O) to exit usb mode
  8. Pop out the memory stick without switching off PSP (This step is vital)
  9. Now switch off PSP.
Now you have your Magic Memory Stick ready.

Installing CFW on your PSP
  1. Pop out your normal battery.
  2. Insert the MMC back.
  3. Hold the UP Button on the D-pad and push in the Datel Tool battery into the battery slot.
As soon as you push in the tool battery, your power LED will start glowing. keep holding the UP Button untill the memory card LED also starts to flash (abt 20 sec).

Now you should see the Despertar menu. TADA.. you are ready to install CFW.. continue the process as below

  1. First back-up your NAND (for safety reasons in case we brick). Press (Square).
  2. Once PSP shuts down after dumping nand, boot using normal battery and transfer nand.bin to your pc for safekeeping.
  3. Now boot back into service mode by holding the UPButton and Tool Battery
  4. This time on the Despertar menu, choose the option to install CFW 3.80 M33-5 by pressing (x)
You will see lot of command lines running across the screen. in the end it will say installation complete and ask to press x. Do so.

Now boot with your normal battery. Goto to System Information on your XMB to check your your CFW version number.

The first thing I did was to upgrade to CFW 4.01M33-2 (read here)

Note: Recently Dark Alex has released an updated DCv6 which directly installs CFW 4.01M33-2.

Read full article...

Sunday, August 3, 2008

Upgrading to CFW 4.01

Once I had CFW 3.80 M33-5, I was eager to upgrade to the latest and greatest (or so I thought) version.

For this, I used the Network Update option in the XMB. This has been hacked to download the latest CFW instead of an OFW update. Though the look and feel of the process remains simillar to doing an official firmware upgrade.

The update process prompted for a missing 401.pbp file and asked permission to download from the internet. Once I clicked (x) to allow this, it connected to the internet and downloaded the required file.

A warning message to make sure we don't run out of power or pull out the stick during the upgrade and then it gets to its job.

Once update completed; press (x) to restart.

And Voila!! We are on CFW 4.01 M33-2


Read full article...

Installed Custom Firmware on my PSP

I have just completed installing CFW 3.80 M33-5 on my PSP.

Details on the installation process to follow soon.

Read full article...

Wednesday, July 23, 2008

Creating Thumbnails for Videos on PSP

You can use an image file to be shown as thumbnail on your PSP's video list.
(If you are wondering how to get videos on you PSP check out this post.)

Save an image file with the same name as the video and .thm extension.
ie: if your video name is "My Video.mp4"; you must name your thumbnail as "My Video.thm"

Place the thumbnail file (one with .thm extension) you have created in the same folder on the PSP as the video.


These thumbnails should now be visible on the PSP's XMB Video list.


The ideal dimensions for using an image as a PSP thumbnail are 160x120 pixels and 72 px/in resolutions.
You can easily scale down to these dimensions using an image editor like GIMP.


Read full article...